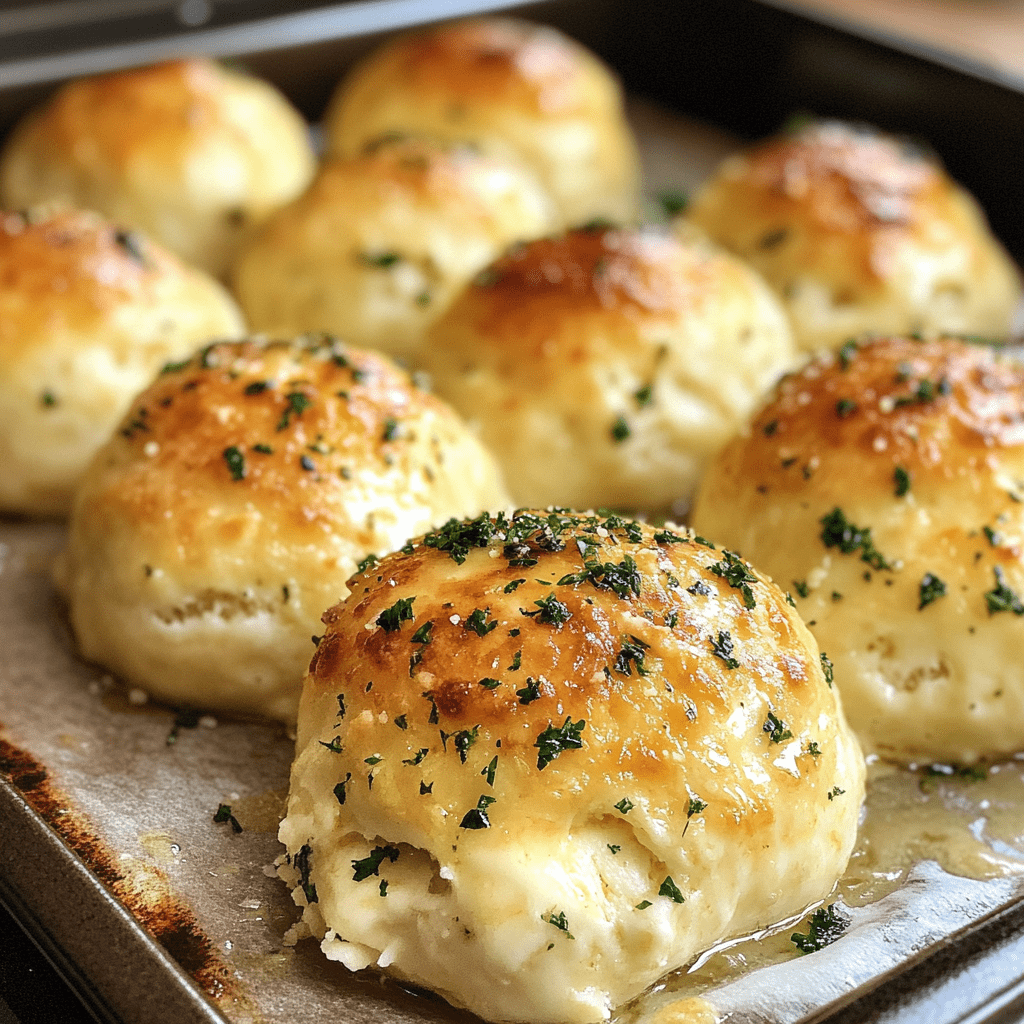
Garlic Butter Cheese Bombs are the ultimate comfort food that combines the irresistible flavors of melted cheese, aromatic garlic, and buttery biscuits. This recipe transforms simple ingredients into an addictively delicious appetizer or snack that’s perfect for parties, game days, or any casual gathering.

Originally inspired by Italian stuffed bread, these cheese bombs have become a modern favorite due to their simplicity and crowd-pleasing nature. The combination of warm, gooey cheese wrapped in soft, garlic-butter-coated biscuit dough creates an explosion of flavors that’s simply irresistible.
Ingredients: Main Components:
- 1 (16 oz) container refrigerated biscuit dough (8 biscuits)
- 4 oz mozzarella cheese (can be shredded or diced string cheese)
- 4 tablespoons unsalted butter, melted
- 1 teaspoon garlic powder
- 1 teaspoon Italian seasoning
- 1/4 teaspoon salt Optional Add-ins:
- 2 tablespoons fresh parsley, finely chopped
- 1/4 cup grated Parmesan cheese
- 1/4 teaspoon red pepper flakes
- 2 cloves fresh garlic, minced (as alternative to garlic powder)
Preparation: Step 1: Prepare the Oven and Workspace
- Preheat your oven to 375°F (190°C)
- Line a large baking sheet with parchment paper or silicone mat
- Clean your work surface thoroughly for rolling out dough
- Have all ingredients measured and ready to use
Step 2: Prepare the Cheese Filling
- If using string cheese, cut each stick into 4 equal pieces
- If using shredded mozzarella, divide into 8 equal portions
- Keep cheese refrigerated until ready to use to prevent premature melting
Step 3: Prepare the Garlic Butter Mixture
- In a small microwave-safe bowl, melt the butter
- Add garlic powder, Italian seasoning, and salt
- Mix well until all seasonings are evenly distributed
- If using fresh garlic, add it to the melted butter mixture
Step 4: Assemble the Cheese Bombs
- Separate each biscuit from the container
- Flatten each biscuit into a 3-inch circle using your hands or rolling pin
- Place one portion of cheese in the center of each flattened biscuit
- Carefully fold the edges of the dough over the cheese
- Pinch and seal the edges firmly to prevent cheese from leaking
Step 5: Final Preparation and Baking
- Place each sealed bomb seam-side down on the prepared baking sheet
- Brush generously with the garlic butter mixture
- Ensure bombs are spaced at least 2 inches apart
- Bake for 12-15 minutes until golden brown
Advanced Preparation Techniques:
- Dough Temperature Control
- Remove biscuit dough from refrigerator 5 minutes before use
- Work quickly to prevent dough from becoming too warm
- If dough becomes sticky, dust hands with flour
- Keep unused portions refrigerated while working
- Cheese Preparation Methods
- For string cheese: cut when cold for clean cuts
- For shredded cheese: toss with 1 tsp cornstarch to prevent clumping
- Consider mixing cheeses (70% mozzarella, 30% cheddar) for more flavor
- Freeze cheese pieces for 15 minutes before using for easier handling
Variations:
- Pizza Bombs: Add pepperoni and pizza sauce inside
- Mexican Style: Use pepper jack cheese and taco seasoning
- Breakfast Bombs: Include scrambled eggs and bacon bits
- Buffalo Style: Add shredded chicken and buffalo sauce
- Spinach Artichoke: Mix in chopped spinach and artichoke hearts
Cooking Notes:
- Ensure all seams are tightly sealed to prevent cheese leakage
- Don’t overbake as this can cause the cheese to become too hard
- Allow to cool for 2-3 minutes before serving to prevent burns
- For even browning, rotate the baking sheet halfway through cooking
- Store any leftover butter mixture in the refrigerator for future use
Serving Suggestions:
- Serve warm while cheese is still melted
- Pair with marinara sauce for dipping
- Sprinkle with fresh parsley before serving
- Excellent alongside a fresh garden salad
- Perfect as an appetizer or party snack
Tips:
- Use cold cheese to prevent premature melting during assembly
- Don’t roll the dough too thin to prevent breaking
- Keep sealed bombs covered while working on others
- If dough becomes too warm, refrigerate briefly
- Double the recipe easily for larger gatherings
- Make ahead and freeze before baking for convenience
Prep Time: 15 minutes Cooking Time: 12-15 minutes Total Time: 27-30 minutes
Nutritional Information (per bomb): Calories: 220 Protein: 7g Fat: 12g Carbohydrates: 22g Sodium: 480mg Fiber: 1g Sugar: 3g
FAQs: Q: Can I make these ahead of time? A: Yes, assemble and refrigerate up to 24 hours before baking.
Q: Can I freeze these? A: Yes, freeze unbaked bombs for up to 3 months.
Q: What’s the best cheese to use? A: Mozzarella works best, but any melting cheese will work.
Q: Why did my cheese leak out? A: Ensure seams are completely sealed and cheese is cold.
Q: Can I use homemade biscuit dough? A: Yes, any biscuit dough recipe will work.
- Mediterranean Style:
- Use feta cheese mixed with mozzarella
- Add chopped olives and sun-dried tomatoes
- Season with oregano and fresh basil
- Brush with olive oil instead of butter
- French Onion:
- Use Gruyere cheese
- Add caramelized onions
- Include fresh thyme
- Serve with onion soup dip
- Korean-Inspired:
- Mix in kimchi and mild cheddar
- Add gochugaru (Korean red pepper)
- Brush with sesame oil and butter mixture
- Top with sesame seeds
- Dessert Version:
- Fill with cream cheese and chocolate chips
- Brush with cinnamon-sugar butter
- Drizzle with chocolate after baking
- Serve with raspberry sauce
Additional Cooking Notes:
Temperature Management:
- Oven position matters – use middle rack
- Check oven temperature accuracy with thermometer
- Preheat oven for at least 15 minutes
- Consider using convection setting at 25°F lower
Texture Control:
- For softer bombs: cover with foil for first 8 minutes
- For crispier exterior: brush with butter twice
- For golden top: brush with egg wash before butter
- For cheese control: use cube rather than shredded
Extended Serving Suggestions:
Dipping Sauces:
- Classic Marinara
- Garlic Aioli
- Ranch Dressing
- Buffalo Sauce
- Pesto
- Honey Mustard
Presentation Ideas:
- Arrange in a pull-apart circle
- Serve in a bread basket lined with cloth
- Create a cheese bomb “bouquet”
- Individual servings in mini cast iron skillets
Meal Pairing Suggestions:
- Serve with Italian wedding soup
- Pair with Caesar salad
- Accompany with tomato bisque
- Serve alongside grilled vegetables
Advanced Tips:
Dough Handling:
- Use bench scraper for easy handling
- Create uniform thickness for even cooking
- Rest dough 5 minutes if too elastic
- Use fork to dock dough if air bubbles form
Cheese Selection:
- Low-moisture mozzarella prevents excess liquid
- Fresh mozzarella needs extra draining
- Combine hard and soft cheeses
- Grate fresh Parmesan for topping
Butter Mixture Variations:
- Brown the butter first for nutty flavor
- Add fresh herbs to melted butter
- Infuse butter with roasted garlic
- Include grated Parmesan in butter mixture
Storage and Reheating:
Storage Methods:
- Room temperature: 2 hours maximum
- Refrigerator: Up to 3 days in airtight container
- Freezer: 3 months when properly wrapped
- Vacuum sealed: Up to 6 months frozen
Reheating Instructions:
- Oven: 350°F for 5-7 minutes
- Air fryer: 320°F for 3-4 minutes
- Microwave: 20 seconds (texture will be softer)
- Toaster oven: 325°F for 4-5 minutes
Troubleshooting Guide:
- Cheese Leakage:
- Solution: Double-seal edges
- Preventive: Use colder cheese
- Fix: Position seam on top while baking
- Recovery: Use foil to catch drips
- Dough Issues:
- Too sticky: Chill dough
- Too dry: Brush with water
- Uneven cooking: Rotate pan
- Burning bottom: Use double pan method
- Texture Problems:
- Too dense: Don’t overwork dough
- Too soft: Increase bake time
- Too crispy: Lower temperature
- Uneven browning: Adjust rack position
Quality Control Checkpoints:
During Preparation:
- Dough temperature: Should feel cool to touch
- Cheese portion: Consistent 1-inch pieces
- Seam security: No visible openings
- Butter coverage: Even coating
During Baking:
- Color development: Golden brown
- Size: Should increase by 1.5x
- Cheese: Should not be visible
- Aroma: Garlic butter fragrance
After Baking:
- Bottom color: Light golden
- Internal temperature: 165°F
- Cheese pull: Should stretch when pulled
- Crust: Slightly crisp exterior
Conclusion: Garlic Butter Cheese Bombs are a versatile and delicious treat that combines the comfort of warm bread with the indulgence of melted cheese. Perfect for any occasion, these bombs are sure to become a favorite in your recipe collection. With minimal ingredients and preparation time, they offer maximum flavor and satisfaction. Whether served as an appetizer, snack, or side dish, these cheese bombs never fail to impress and can be customized to suit various taste preferences. The key to success lies in proper sealing and careful attention to baking time, resulting in perfectly golden, cheese-filled delights that will have everyone asking for the recipe.


Leave a Comment